dbMap/Web – Import and Export Resource Computation Data
PLDB allows you to export a complete resource computation to an EXCEL spreadsheet (.xlsx file), as well as to import resource data and parameters from an external spreadsheet file into your computation, provided that the supported import formats are used.
Every time you export a resource computation, the resulting file will contain a special sheet at the end, named PLDB IMPORT, produced in a format suitable for a subsequent import.
If you want to use your own spreadsheets, you must save them as MICROSOFT EXCEL xlsx files and make sure they all have a sheet, named PLDB IMPORT, containing data in the format described below. We recommend that you use an existing exported spreadsheet as a template to produce your own importable data sets, if you're not using the PLDB application to generate the input data.
An import operation does not store anything in the underlying database. Import simply mimics the typing action, filling in relevant data cells from the selected spreadsheet. So, after performing an import, you will have to manually adjust whatever needs to be changed; recalculate and, if so wanted, save the resulting data (or export them back to a new spreadsheet).
Further details are given below.
EXPORTING A RESOURCE COMPUTATION
The Export Button
Every calculation screen that is not pending computation might be the basis for an export operation. This means that, if you are in edit mode, you will only be able to export after computing or cancelling all the changes and reverting back to the original, validated state. The export button will be disabled otherwise.
When you press the export button, you will be able to choose where to store and how to name the resulting file.
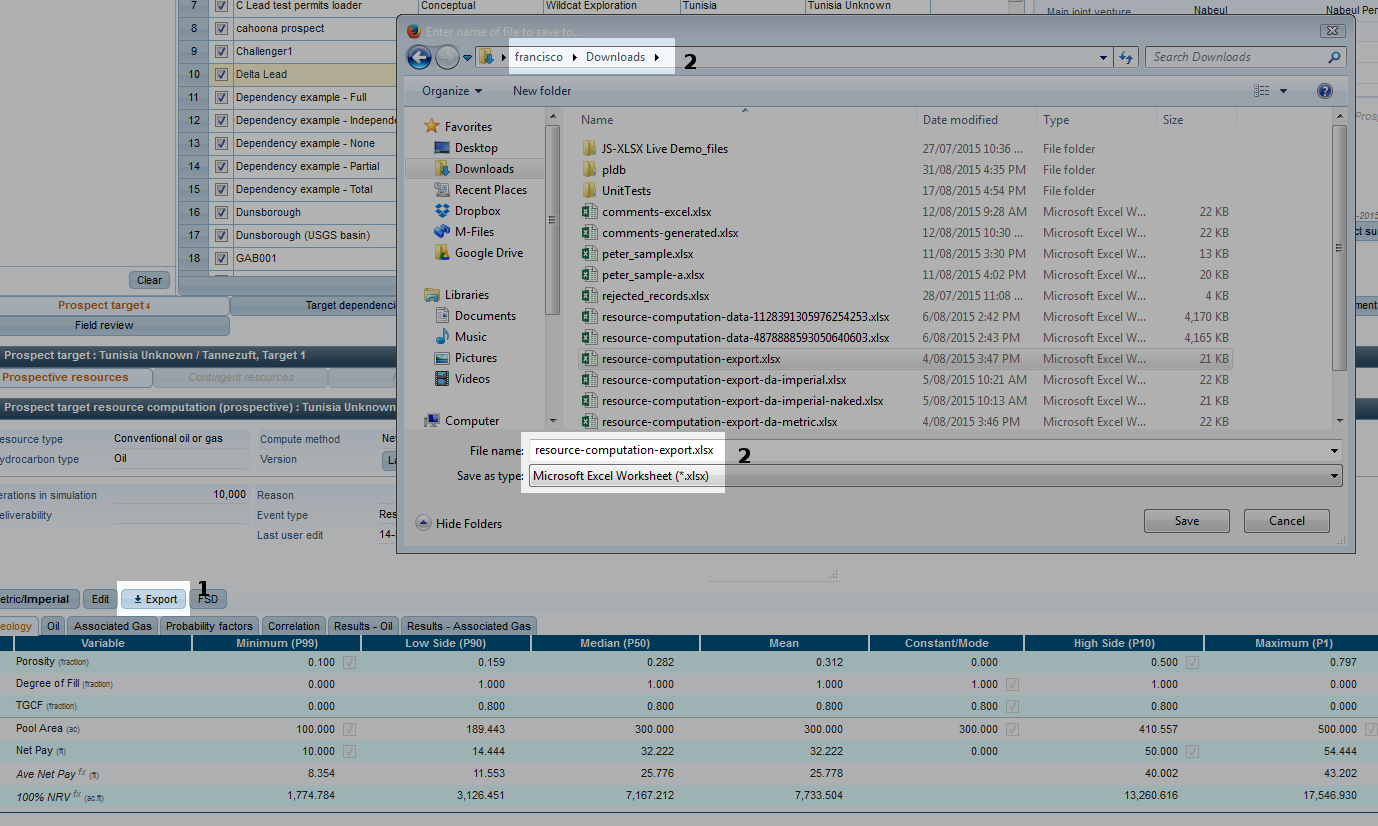
1. Export button |
Exports the current computation to an EXCEL 2007 compatible file. |
2. Folder and file name selection. |
Select the folder and file name for your export file. |
If you open the resulting file, you will notice that it contains that special sheet, named PLDB IMPORT, recorded in a format suitable for importing it back.
The Special “PLDB IMPORT” Sheet
This sheet contains all variable, correlation, factor and depth area definitions of your computation screen. These data are distributed in sections, each initiated by a standard section delimiter.
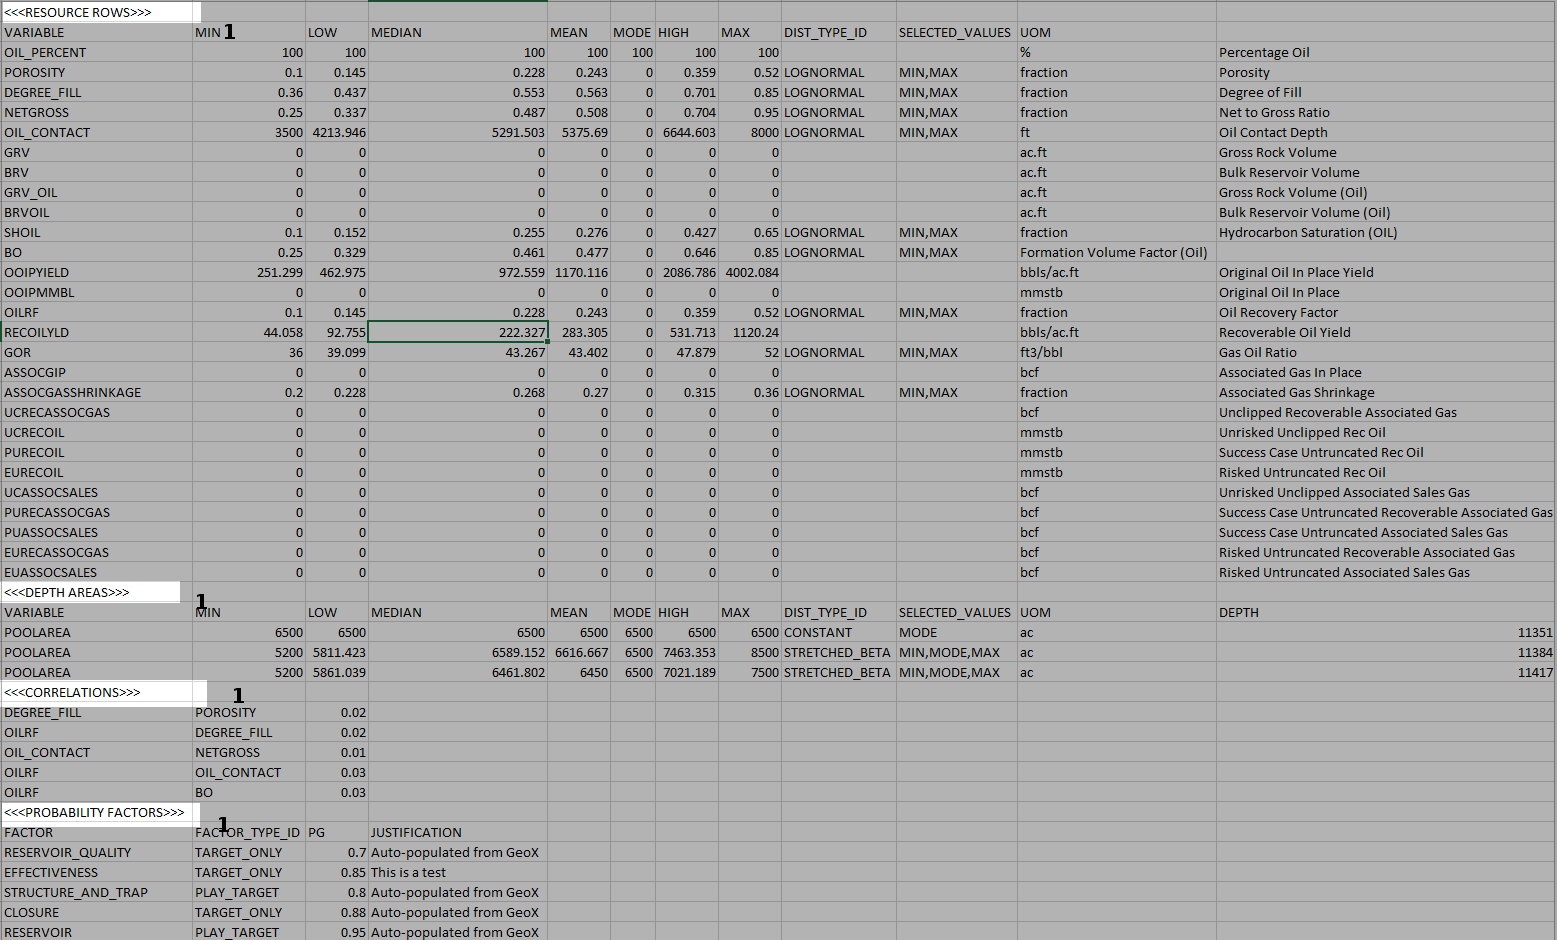
1. Standard section headers. |
Each section in the “all in one” sheet begins with a standard section header. This header must have this format, must be in the 1st column and must be the only element in the row. |
THE PLDB IMPORT SHEET SECTIONS
A section that is not defined for a particular computation might be omitted, or it may be mentioned but totally empty, with just the section delimiter and nothing else. The distribution of sections in this sheet is irrelevant: they can appear in any order.
The section delimiters must each be on a single row, containing nothing but the delimiter itself on the first column. The possible values are:
<<<RESOURCE ROWS>>> - for the variables in the various tabs of your screen.
<<<DEPTH AREAS>>> - for the data in the Depth Area tab, if defined. This is specific to the depth area calculation method.
<<<CORRELATIONS>>> - for any defined correlation pair.
<<<PROBABILITY FACTORS>>> - for the chance factors defined.
Below each delimiter, the rows containing relevant data follow. There are no “end of section” delimiters. The beginning of a section marks the end of the preceding one. A section will be ignored if its delimiter does not match one of the above mentioned values.
The <<<RESOURCE ROWS>>> Section
The figure below depicts a <<<RESOURCE ROWS>>> section.

The important points to keep in mind are:
The line immediately following the section header must contain the exact same headers shown there. The only exception is the first column, where “VARIABLE” is written. This can actually contain any value, as the title is there just for clarification.
The variable name must be a name recognisable by PLDB, or the row will be ignored. These variables are defined and managed by the system itself. The variable name must be the first non blank cell in a row.
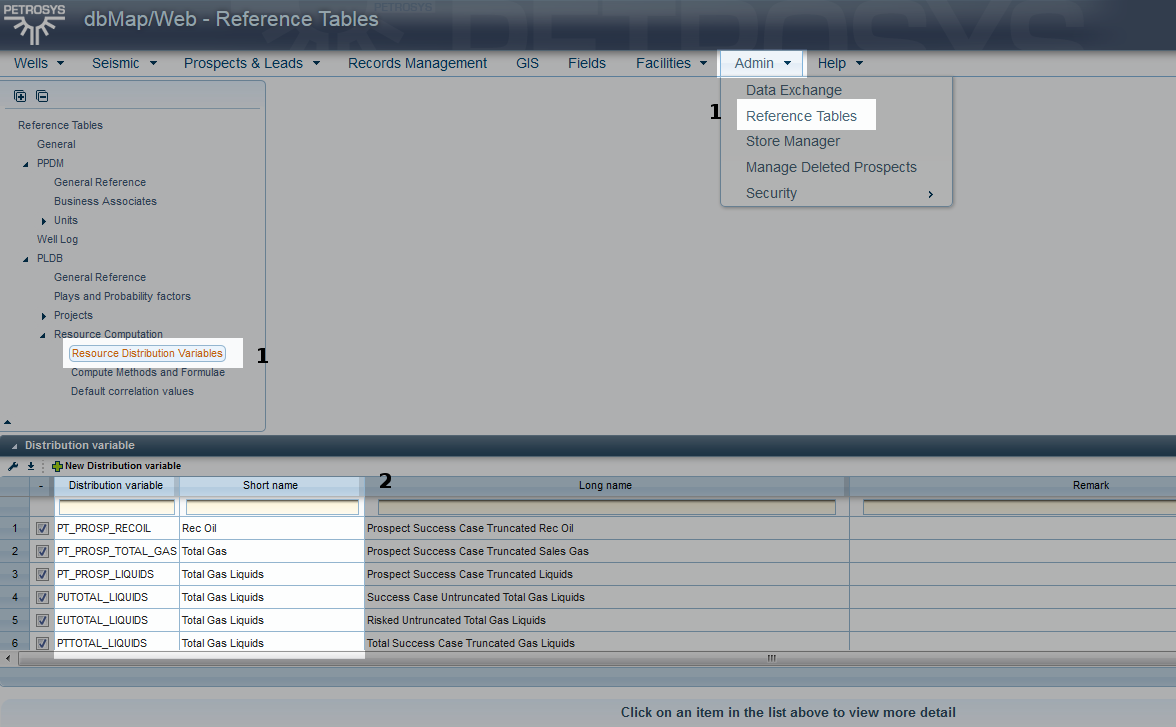
1. Options to define variable names |
You should select Admin → Reference Tables → Resource Distribution Variables in order to define variable names. |
Only lines with a valid DIST_TYPE_ID will be imported. In the example below, OIL_PERCENT, GRV and BRV wouldn't be, as there are no distribution types defined for them.
The SELECTED_VALUES column is optional. However, if your spreadsheet row doesn't indicate which values should be selected (SELECTED_VALUES empty or invalid), the import process won't be able to mark any of them on the screen and you will have to do it manually afterwards.
The UOM column is also optional. If it's filled in, it must contain a code recognisable by PLDB; otherwise, the values on the corresponding row will be ignored and an error message displayed. However, if you leave it blank, all values will be assumed to be in the same units used for storing your original computation. This is certainly fine for fractions, which are not dimensional, but it might cause undesirable effects, such as metric values being treated as imperial ones, if you store your data in imperial units and are importing a metric spreadsheet containing no units of measure (see the topic about unit conversions below).
You can mix metric and imperial units on the same spreadsheet, as unit conversions are done on a “per row” basis.
The <<<PROBABILITY FACTORS>>> Section
This section is entirely optional and has the following layout.

Again, the factor name must comply with PLDB conventions and must be named on the first column.
Only two columns are imported: PG and JUSTIFICATION.
The <<<CORRELATIONS>>> Section
Another entirely optional section, it should contain only pairs with non zero values, as zero values are ok but meaningless.

You should state the correlated variables' names and the correlation factor, that should be something between 0 and 1. The variable names, of course, must be recognisable by PLDB and should be present in your target computation's correlation matrix.
Pairs with variables that are not in the target correlation matrix will be ignored, even if the variable names are valid.
The <<<DEPTH AREAS>>> Section
This section only makes sense for computations using the DEPTH AREA method. It will be ignored otherwise, even if present.

Although optional, this section can be a bit tricky to fill-in. Points you should keep in mind are:
The variable name (POOLAREA) is merely a filler, being there for the sake of clarity. The import process doesn't care about what is written there.
If the DIST_TYPE_ID is blank, the row will be ignored. The value there must be a valid distribution type for the data in order to be properly imported.
There are TWO units of measure: one (UOM) refers to the variable values (MIN, LOW, etc) and another one (AREA_UOM) to the DEPTH number. They are both optional, but the system will consider the corresponding values as expressed in the current storage units if they are not mentioned. Again, as in the <<<RESOURCE ROWS>>> section, you might experience undesired side effects if you are importing metric spreadsheets to an imperial calculation (please, see the topic regarding unit conversions below).
IMPORTING A SPREADSHEET INTO A RESOURCE COMPUTATION
You can try to import any spreadsheet and you are in no obligation to import only spreadsheets saved for the same resource type, compute method or hydrocarbon type. The system will import only the relevant parameters and variables, ignoring the others.
Whatever the case may be, the EXCEL WORKBOOK must have a sheet named PLDB IMPORT in order for it to be imported. If there's no such sheet in the Workbook (EXCEL file), no data will be imported into your calculation.
The Import Button
This button is displayed when you are in “edit” mode only, that is: after you press the Edit button. You won't see it if you're just looking at the data.
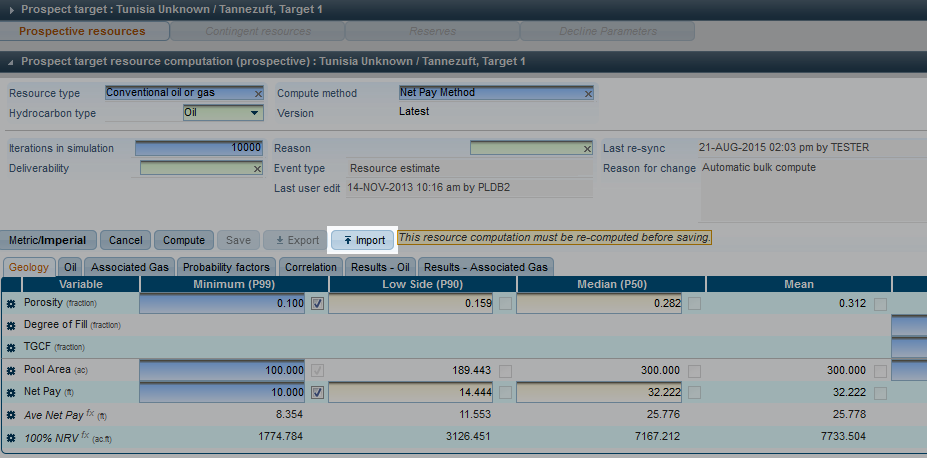
You begin an import operation by clicking on it.
The Import Procedure - Summary
Whenever you press the Import button, a standard file selection dialogue pops-up, so that you can select a file to be imported. Just press the Load button to start the import.
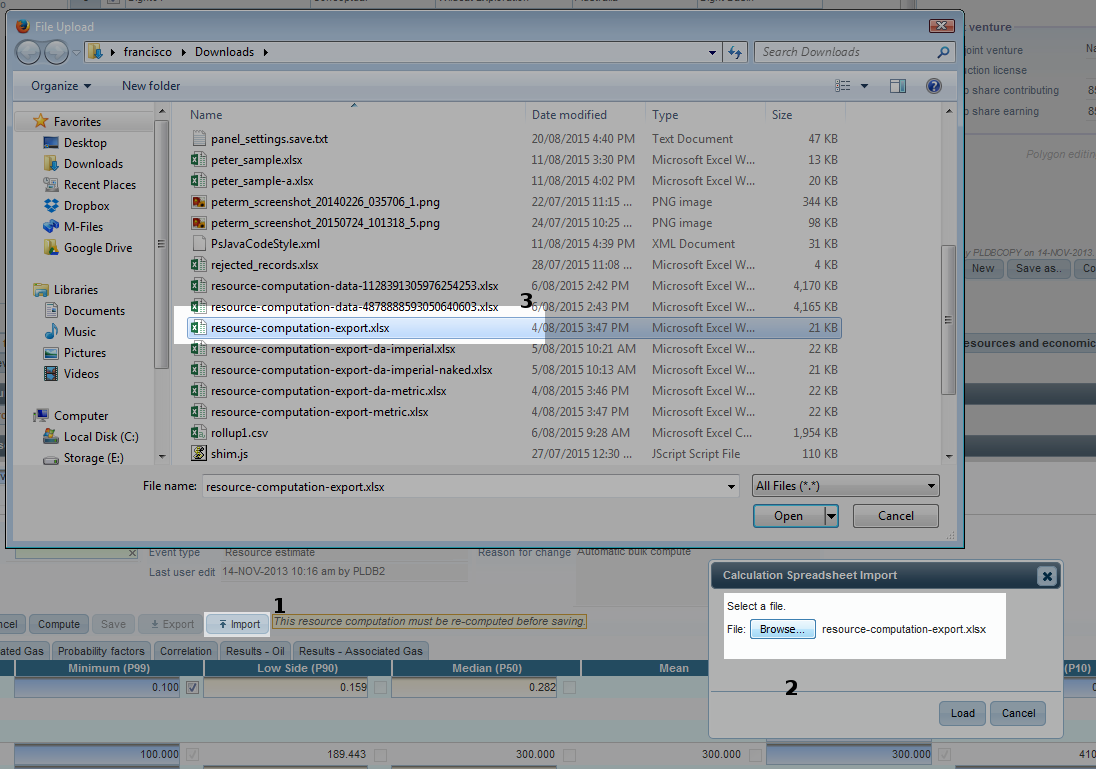
1. Import button |
Visible only in “edit” mode, this button starts an import operation. |
2. File selection dialogue. |
The 'import” button opens the file selection dialogue, allowing you to select a spreadsheet to be imported. |
3. Standard file selection screen. |
You select a spreadsheet using the standard file selection screen of your operating system. |
When finished, the import function will let you know how many variable lines could be imported, if any. If your spreadsheet contained no usable variables, an error message will be displayed, too.


At the end of this procedure, your screen will contain data from the spreadsheet merged to the data that was already there. You are free to type in any changes, delete any data or even import another spreadsheet into the same calculation.
What is Actually Imported and What Should You Do Next
The system will:
Import all variables under the <<<RESOURCE ROWS>>> section that exist in your current calculation and have a DIST_TYPE_ID. The selection indicators will be updated, too, if the column SELECTED_VALUES contains valid data.
Append all depth areas in the <<<DEPTH AREAS>>> section to your existing depth area definitions, provided that you are using the DEPTH AREA method and the depth area definitions on the spreadsheet mention a DIST_TYPE_ID. Depth areas with no DIST_TYPE_ID will be ignored. Again, if there is indication of SELECTED_VALUES, all visual select markers will be updated accordingly.
Import all probability factors.
Import all correlations present , unless a correlation is defined as having a default value in the database with no changes allowed. These ones will inherit these values and you won't be able to change them. They will be shown on the screen as read-only fields.
IMPORTANT: The import process might leave your calculation in an inconsistent state. Two or more depth areas with the same depth and results that are incompatible with the oil contact numbers are two possibilities, but there can be others.
After an import operation, you will have to compute again, fixing manually any errors detected by the system and adjusting the parameters if necessary. You may also have to manually select the relevant values for your computation, if they are not indicated as such in the spreadsheet.
Unit Conversions Performed
The system will try to convert all imported numbers to the units you are using currently on your screen. However, the units in which your imported numbers are expressed will be made equal to calculation storage units if not explicitly mentioned in the spreadsheet.
The table below summarises the system actions for each case. Actions that will potentially lead to wrong numbers are marked in red:
Unit in Spreadsheet |
Storage Unit |
Visible Units |
System Conversion / Remarks |
None |
Imperial |
Imperial |
None |
None |
Imperial |
Metric |
Imperial to Metric / Will only be ok if numbers in spreadsheet are in imperial units. |
None |
Metric |
Imperial |
Metric to Imperial / Will only be ok if numbers in spreadsheet are in metric units. |
None |
Metric |
Metric |
None |
Metric |
Any |
Metric |
None |
Metric |
Any |
Imperial |
Metric to Imperial |
Imperial |
Any |
Metric |
Imperial to Metric |
Imperial |
Any |
Imperial |
None |