dbMap/Web – Creating and Modifying Prospects
Using dbMap/Web it is possible to modify all information associated with a prospect, modify any associated records in the current database (such as prospect targets, drilling opportunities and joint ventures) and make records of the change history using a built in documentation system.
This section will discuss making changes to prospects from the current prospect list, making a record of those changes using the built in commenting and documentation system, and creating new prospects.
Making Changes to a Prospect
Prospects are edited from the current prospect list, which is generated using the search and query options discussed in the previous topic.
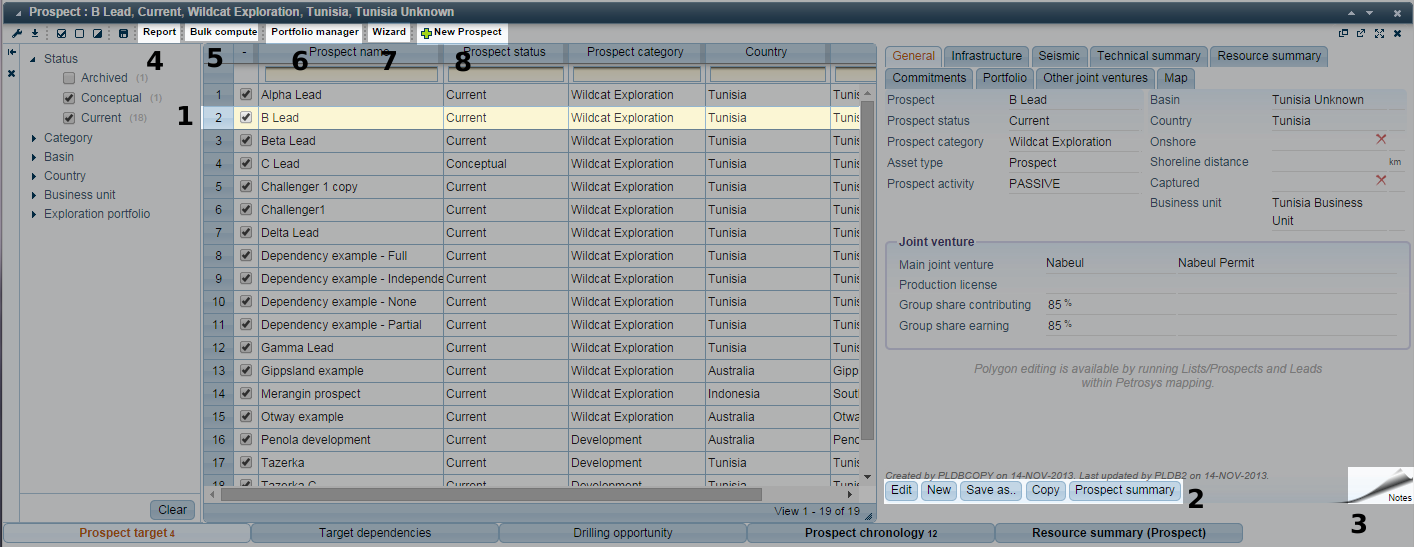 Click to Enlarge | |
1. Selected Prospect |
Before changes can be made to a prospect, it must be selected from the current prospect list. Details relating to the selected prospect will be displayed in the right half of the window. |
2. Editing Options |
Options for creating, editing and removing prospects are available below the details area. |
3. Add Note |
Notes, images, hyperlinks and other information can be documented using the Notes option. This provides a direct and simplified means of associating additional information with a prospect. |
4. Report |
Run standard and custom sql reports based on the list of currently selected prospects. |
5. Bulk Compute |
The Bulk compute option is used to re-compute all resource computations associated with the current prospect. |
6. Portfolio Manager |
Manage portfolios, add/remove prospects and create snapshots. |
7. Wizard |
Launches a wizard to guide users through prospect creation. |
8. New Prospect |
Create a new prospect. Discussed in detail below.. |
To make changes to a prospect, first select the required prospect from the prospect list (1). Details of the selected prospect will be displayed in the details area, on the right side of the Prospect window.
The fields listed in the details area are either entered directly into the database, or computed from values stored with the prospect and associated records. Fields entered directly into the database can be modified using the Edit button. Computed fields cannot be modified directly, and may only be re-computed.
To make modifications to the selected prospect, click the Edit button. After clicking the Edit button, the details area will change, allowing modifications to be made to most of the fields in the current prospect (the only exception is the fields under the Resource summary tab, which must be re-computed).
The options available at the bottom of the details area will also change, to provide a means of saving changes made to the current prospect (using the Save button) or cancelling the changes and returning the details screen to its previous state.
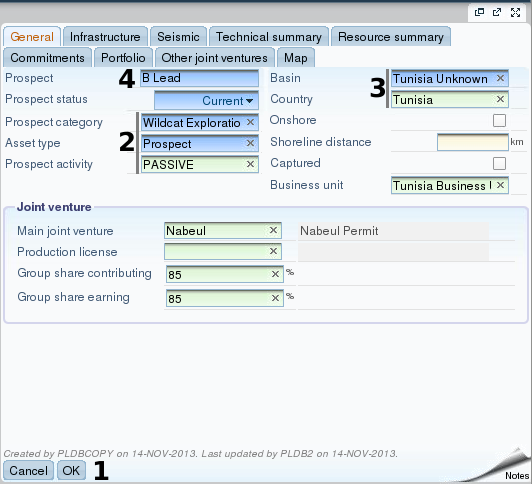 | |
1. Save/Cancel Current Changes |
Save changes made to the current prospect, or cancel the changes and return the details area to its previous state. |
2. Fields Linked to Reference Tables |
The value of fields shaded in green or blue (for mandatory fields) is restricted using a reference table. Clicking these fields will launch the associated reference table, allowing a new value to be selected. The “x” icon can be used to clear the current value from the field. |
3. Mandatory Fields |
Fields shaded in blue are mandatory, and must contain a value before the prospect can be written to the database. |
4. Fields Supporting Direct Text Entry |
The value of fields shaded in white is determined by manual text entry. |
Depending on the configuration of the current database, the values associated with many of the fields may be restricted by a reference table. If this is the case, the field will be highlight in either green (2) or blue (3) with an “x” icon to the right of the text. Clicking the text will launch a list of the values which can be associated that field. The reference table used to determine these values will be displayed in the title bar of this list.
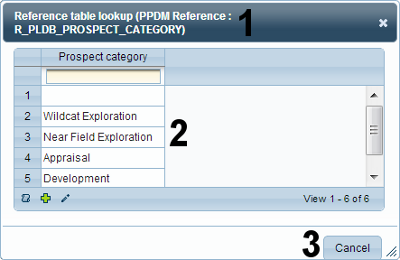 | |
1. Current Reference Table |
Name of the current reference table (in brackets). |
2. Reference Table Values |
Reference table values. To associate a value with the current field, click any of the entries in the table. The table can be filtered by entering a filter string into the field underneath the heading of each column, the same method used for filtering a list of prospects. |
3. Cancel Button |
Cancel any changes and return to editing the prospect. |
Other fields may have text entered into them directly, while others may simply be either enabled or disabled. Again, which fields can be edited in what way will depend on the configuration of the current database.
Tutorial: Changing the Activity and Country Associated With a Prospect | ||||||||||||||
|
After making the required changes to the prospect, click the Save button to return the details area to its previous state. Alternatively, the Cancel button can be used to discard any changes made and return the details area to its previous state.
Computed fields, such as those under the Resource summary tab, are only changed after the associated values are re-computed. The values under the resource summary tab are computed from the resource computation of each of the targets associated with the current prospect.
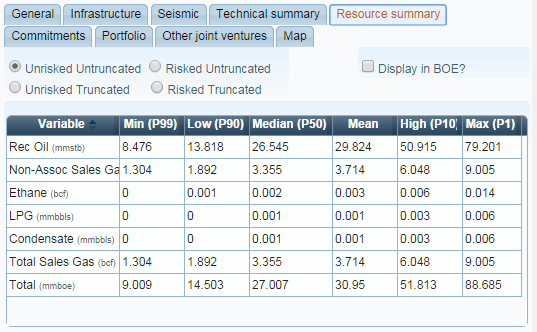
The resource summary can be updated either by re-computing each of the resource computations individually, or by using the Bulk compute option in the toolbar, which will re-compute all “out of sync” resource computations. A resource computation is considered out of sync if values on which the computation is dependent have been updated, and the computation has not been re-run using the new values.
Resource computations are discussed in detail later in this topic.
Milestones
It is possible to define and flag key milestones for a prospect, so the status within it's life-cycle can be easily tracked. e.g. has a Peer review been performed, and is it now ready for a Drill-ready review?
The current milestone is visible in the prospect list and on the prospect header General tab as 'Exploration milestone', with the option to filter by milestone in the tree on the left.

The milestone history is shown on the prospect header Milestones tab. From here new milestones can be created. When created, milestones link to the current rolled up prospect resources at the date of the event, so resource changes over time can also be seen.
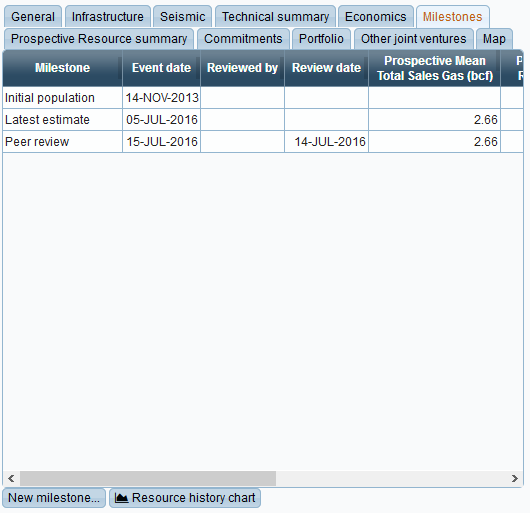
Milestones are also visible in more detail from the Prospect Chronology screen, where they can be edited.
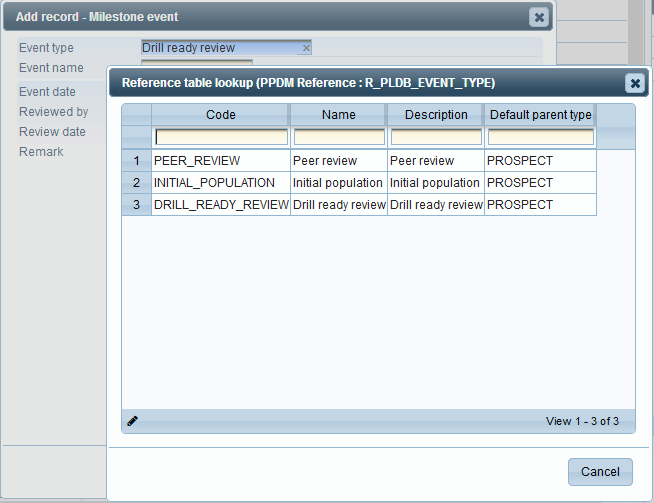
New milestone event types can be created from the pencil icon on the Event type lookup, or by going to Admin/Reference tables/PLDB/General reference/Event types.
Documenting Other Related Information
The Notes option, which is available in the lower right corner when viewing the details of most records stored in the current database, can be used to associate additional information with the current record. Notes can include text, images and hyperlinks; and may be categorised using a range of “note types”, which will be used in the heading of the note when it is saved to the database.
After clicking the Notes button, a new panel will be launched. Existing notes associated with the current record will be displayed in the lower half of this panel. A new note may be added to the record using the options in the upper half of the panel. When viewing notes, the note creation options can be minimised by clicking the Cancel button.
The Notes window can be closed using either the “x” icon, in the title bar of the window, or by clicking the Close button, in the lower right corner.
Creating and Editing a Prospect Polygon
A prospect can be associated with a polygon, which can be used to represent the geographical extent of a prospect on a map. To associate a prospect with a polygon, or edit or change the polygon already associated with a prospect, dbMap/Web must be launched from within the Petrosys application. This is accomplished by selecting /Lists/Prospects and Leads... from the main menu of the Mapping application.

dbMap/Web will be launched in a new window. This instance of the database can be used in the same way as that launched from a web browser.
After browsing to a specific prospect, the Prospect Polygon options will now be enabled.
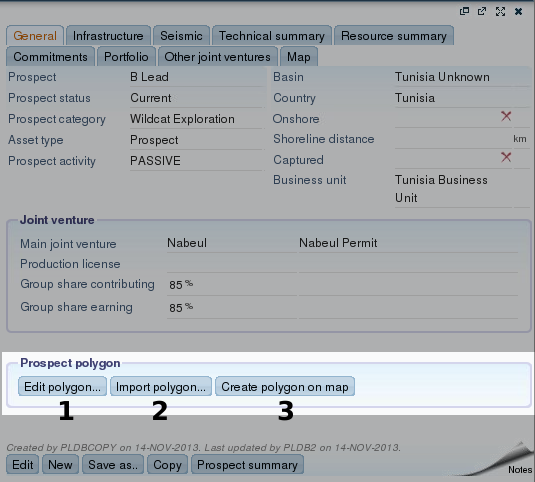 | |
1. Edit Polygon |
Edit the polygon associated with the current prospect in the polygon editor. More information about using the polygon editor can be found by consulting the corresponding section of the Petrosys online help. |
2. Import Polygon |
Associate the current prospect with an existing polygon stored in either the current database, or a Petrosys polygon file (.ply). |
3. Create Polygon on Map |
Create a new polygon on the current map sheet, which will then be associated with the current prospect. |
These options allow a new or existing polygon to be associated with the current prospect (2 and 3 respectively), or for the polygon currently associated with the selected prospect to be modified (3).
Importing an Existing Polygon
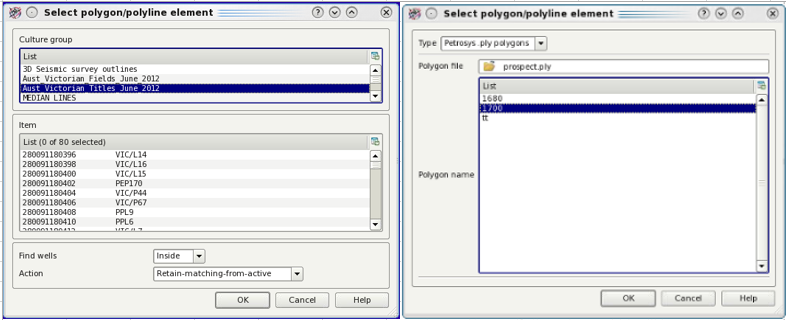
The Import polygon option allows an existing polygon to be associated with the prospect. Clicking the button will launch a new window, which can be used to specify which polygon will be associated with the prospect.
 Click to Enlarge |
After selecting a polygon, click the OK button to return to dbMap/Web.
Creating a New Polygon Using the Map Sheet
Alternatively, a new polygon can be created on the current map sheet using the Create polygon on map option. After clicking the button, navigate back to the Mapping application window, then use the cursor (which will appear as a large red cross when moved over the map canvas) to define the shape of the new polygon.
Each click will add a new vertex to the polygon. Double clicking will finalise the polygon creation process and draw one final line between the last vertex (the one created using the double click) and the first vertex (the first click made on the map canvas).
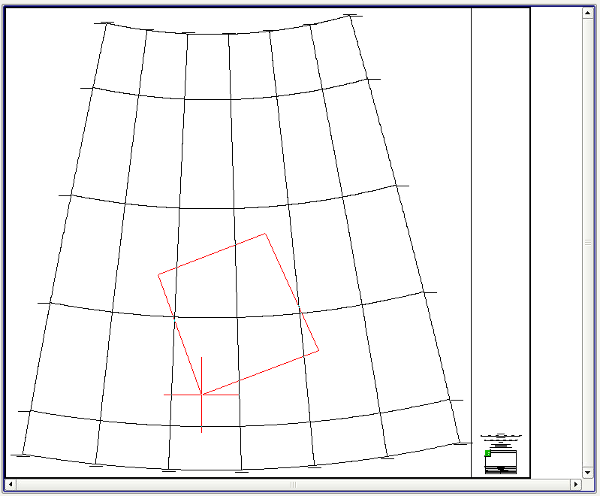
If a mistake is made, right clicking once can be used to undo the previously created vertex. Undoing the vertex created by the first click will exit the polygon creation process and return to dbMap/Web.
Editing an Existing Prospect Polygon
The Edit polygon button can be used to modify the polygon associated with the current prospect. Polygons are modified in Mapping using the Polygon editor, which all aspects of the current polygon to be modified as required. More information on using the Polygon editor can be found in the Petrosys online help.
A new Prospect can be added to the current database using either the New Prospect button in the toolbar, or the New button at the bottom of the details area.
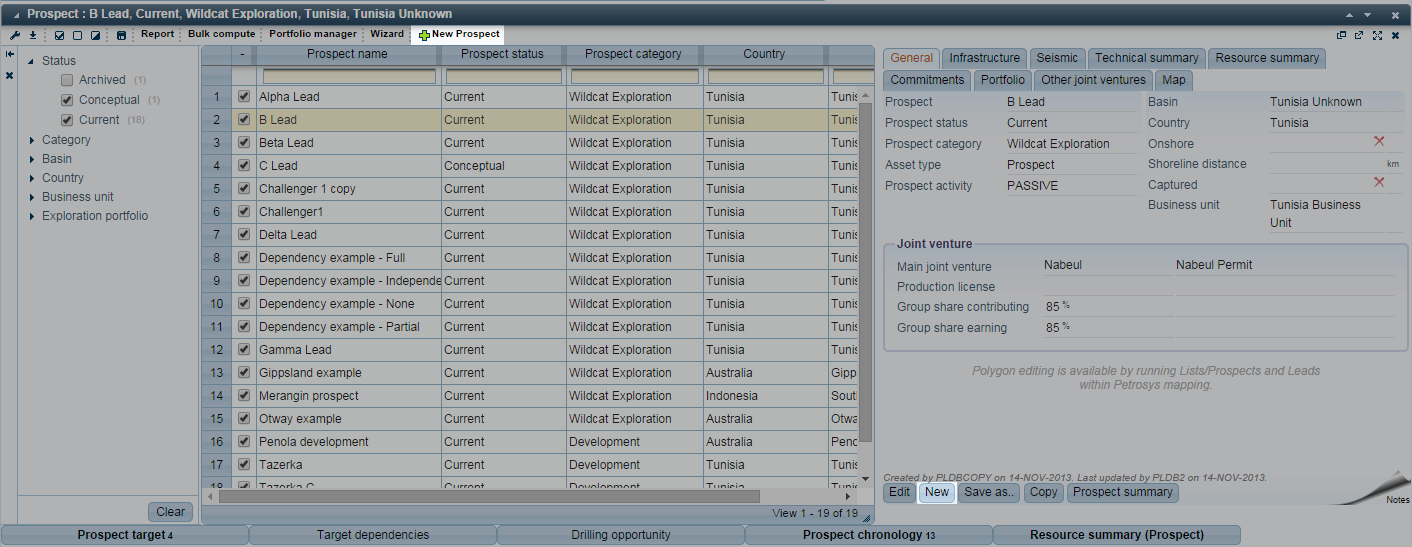
Clicking either option will open a new, empty Prospect in the details area, which can be filled out as required.
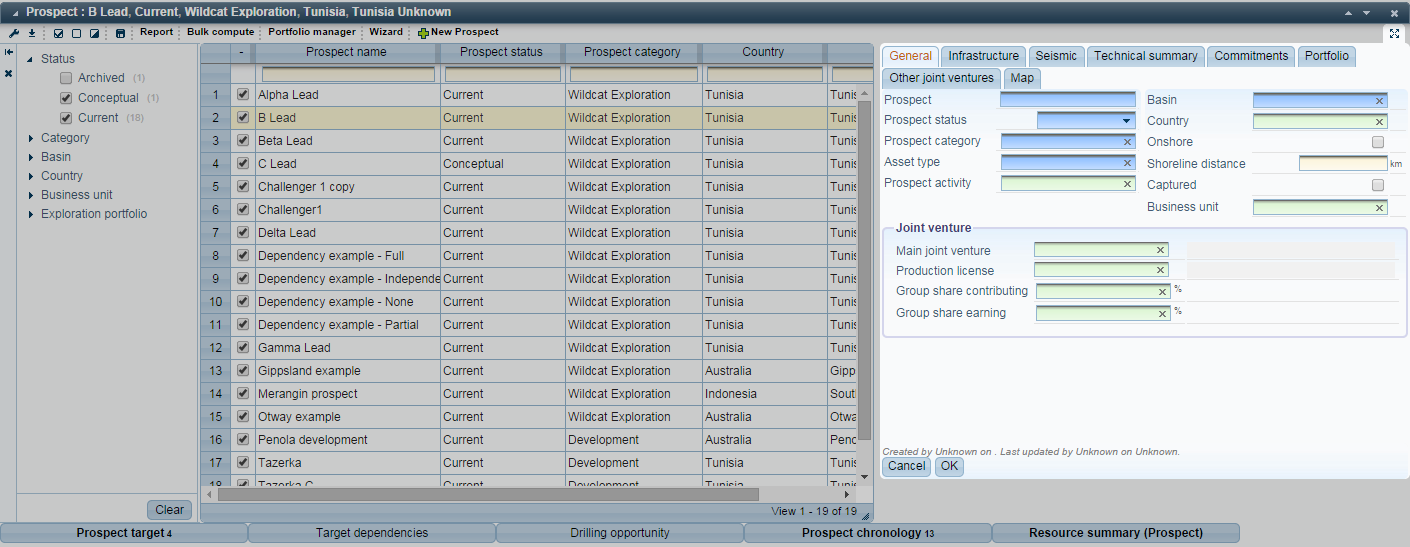
When entering data into a new prospect, ensure that all mandatory fields (highlighted in blue) are populated. Prospects cannot be saved back to the current database until these fields are populated.
After entering the required data, the Save button at the bottom of the details area can be used to save the new prospect back to the current database.
Prospect Targets and Resource Computations
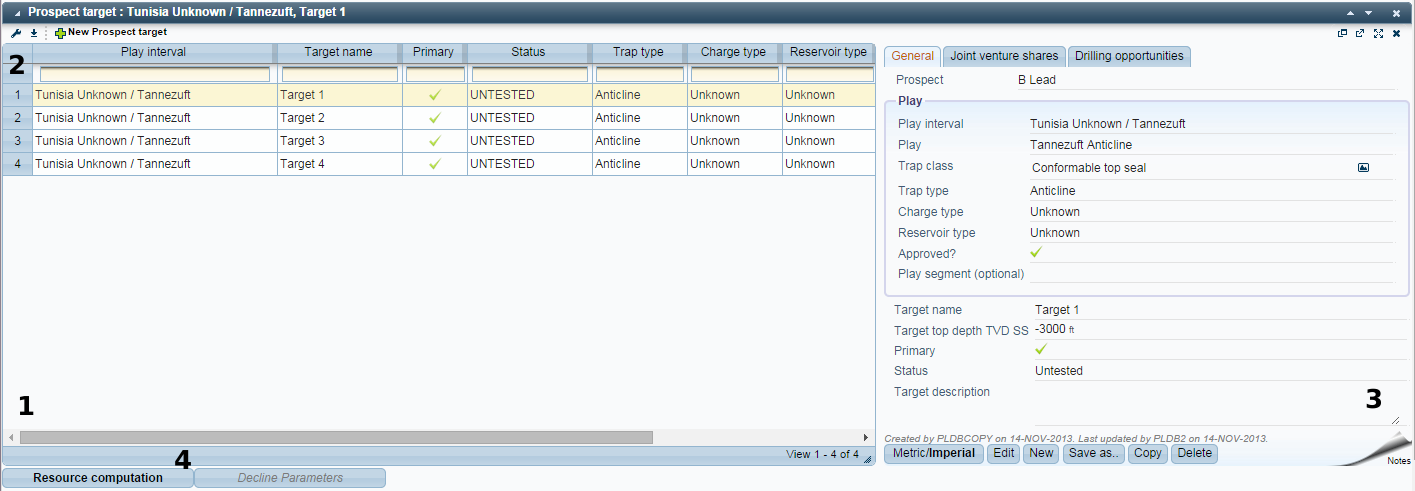
Targets associated with a prospect are stored as individual records, which can be listed by clicking the Prospect target button at the bottom of the Prospect window. Prospect targets will be displayed in a new window, which will appear underneath the Prospect window.
 Click to Enlarge | |
1. Prospect Target List |
A list of the targets associated with the selected prospect. List items may be filtered by column values using the field below each column heading. |
2. Toolbar |
Configure the columns on display in the current list, export the contents of the list to a CSV file or add a new prospect target. |
3. Prospect Target Details |
Browse / edit the details associated with the selected prospect target. |
4. Target Resource Computations |
View the resource computation (if applicable) associated with the selected prospect target. Resource computations are summarised under the Resource summary tab of the selected prospect. |
The Prospect target window functions in the same way as the Prospect window - a toolbar is provided along the top of the window (2), prospect targets are listed in the table in the central part of the window (1), filtering options are available under the column headings, and the details of the selected target are displayed on the right side of the window (3).
Toolbar options can be used to configure the columns currently on display, export the contents of the current list to a CSV file and create a new prospect target. More detailed information on these options can be found in the toolbar summary, in the previous section of this guide.
An estimate of the resources available within a target can be made by clicking the Resource computation button, below the current list of prospect targets. This will open a new window displaying the details of the resource computation associated with the selected prospect target.
 Click to Enlarge | |
1. Resource Computation Details |
Information associated with the current resource computation. This can be edited by clicking the Edit button, below the listed details. |
2. Computation Options |
Toggle unit type, make changes to or re-calculate the current resource computation; or export the details of the current computation to an Excel spreadsheet. |
3. Results of Current Computation (if previously computed) |
Computation results are displayed under a range of tabs, |
The details of the selected computation will be displayed at the top of the details window (1). If no computation has been configured for the selected target the details, along with the Edit, Export and Metric/Imperial buttons, will be the only items visible. If a computation has been configured and run, the results of the computation will be displayed in the tabbed area in the lower half of the window.
Editing a Resource Computation
Click the Edit button to create new values, or make changes to the values in an existing computation. Editing the details of a Resource computation works in the same way as editing the details of any other record in dbMap/Web. Clicking Edit will invoke edit mode, in which the fields in the details area can be modified. The Save button can be used to save changes back to the current database, and the Cancel button can be used to discard any changes and return to the computation details.
 Click to Enlarge | |
1. Metric/Imperial Switch |
Switch the units used by the computation between metric and imperial. |
2. Cancel Current Changes |
Cancel any changes made after entering edit mode and return to the details screen. |
3. Run Computation |
Generate a resource computation for the current target. |
4. Save Current Changes |
Save any changes made to the current database. Note that if any of the values used in the computation have been changed (and this includes values in any of the records associated with the current target) the resource computation must be re-computed before any changes can be made. If this is the case, an error will be displayed to the right of these options, and the Save button will be disabled. |
Re-computing an Out of Sync Resource Computation
Resource computations rely on a range of information associated with the Prospect, the Prospect target and the Play interval in which the computation is being made; they don't rely solely on the information recorded in this area. If any of the information used by a resource computation is out of date, the computation must be re-calculated before any changes can be made.

To re-compute the values in the resource computation, either click the Recompute button to the right of the error message, or use the Compute button available while editing the computation details.
Recall that resource computations for all targets in a given prospect can be performed using the Bulk compute option, in the Prospects window.
Other Records Associated With a Prospect
In addition to Prospect Targets, Prospects can be associated with a very wide range of data; including joint ventures, prospect events and (although not directly related) play intervals.
Records associated with the current prospect can be accessed using the buttons along the bottom of the current prospect list.
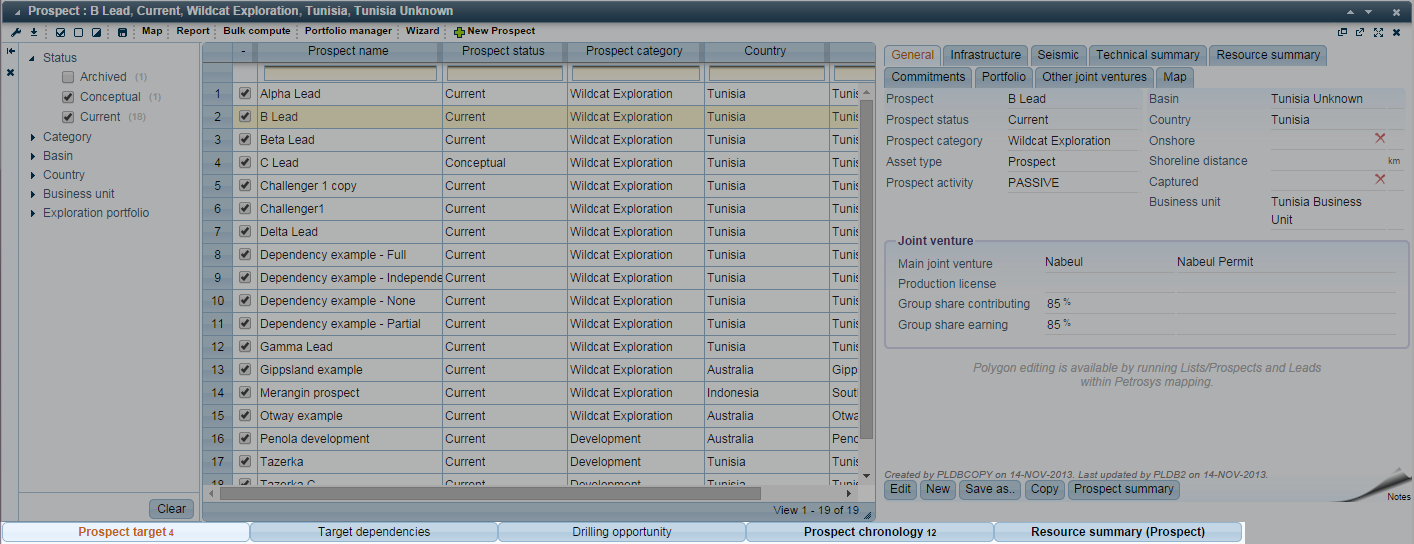
Clicking any of these buttons will open the corresponding information in a new window, below the Prospect window. These windows work in much the same way as the main Prospects window, and may be used to create, view and edit the records associated with the prospect.