dbMap/Web – Search and Navigation
A list of prospects can be generated using the search and query options, which are available after launching the Prospects and Leads database in dbMap/Web.
 | |
1. Click the Prospects & Leads menu |
This opens a list of the available options within PLDB |
2. Click the Prospects menu item |
The first item displayed after clicking the button will contain the search options. These are used for generating a list of prospects from the current database. |
This section will discuss using the search options to generate a list of prospects from the current database, browsing through a newly generated list, and using the filtering and selection options to work with a more precise sub-set of data from the current list.
Generating a List of Prospects
The most straightforward way of finding an item in the current database is by entering specific keywords or search terms into the “common fields” box at the top of the page. After entering the required terms, click the Search button.
 Click to Enlarge | |
1. Enter a Search Term |
Keywords used to initiate a search should be entered into the search field, at the top of the interface. |
2. Click the Search Button |
Matching records will be displayed in the Prospect window, below the search options. |
3. Current Search Terms |
The term used to generate the list of records in the Prospects window will be displayed at the bottom of the search box. This term can be removed from the current search (which will discard the associated list of records) by clicking the Clear button. |
The list of prospects matching the search terms will be displayed in a new window below the search box. If no matching prospects are found in the current database, the message “No records available” will be displayed below an empty list. Consider re-phrasing the search terms, or using one of the other methods of generating a database list which are discussed at the end of this topic.
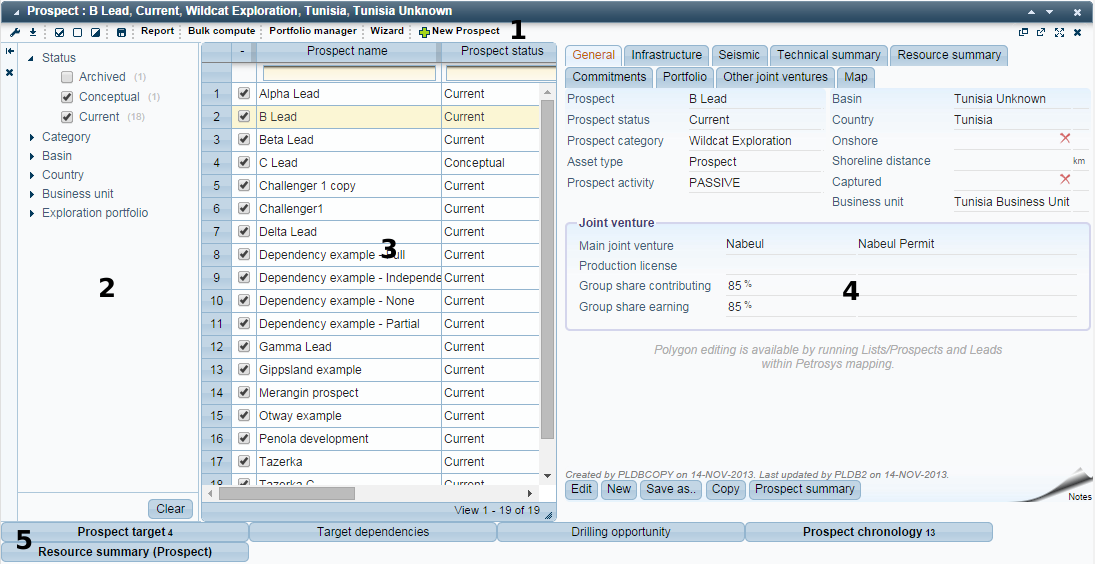
The list of prospects retrieved by the chosen search method will be displayed in the Prospects window. The prospects window can be divided into five sections (as illustrated in the image below) and is used to perform a wide range of operations on the data in the current list, and any related items from the current database; such as prospect targets, drilling opportunities and joint ventures.
 Click to Enlarge | |
|
The window can be closed using the “X” icon in the top right corner. The two arrow icons to the left can be used to cycle through records in the current table (in this case prospects). Windows can be minimized by clicking anywhere within the title bar. The toolbar contains a range of options used for working with the current list. |
|
Filter records from the current list by the value of a specific field. |
|
Determined by the current search and filter options. The image above shows a list of prospects from the current database. |
|
4. Details of Selected Prospect |
Information associated with the selected prospects. This includes information entered directly into the database (the General, Infrastructure, Seismic and Technical Summary tabs) and information which is computed from other data (the Resource Summary tab). |
5. Targets, Opportunities and Other Information Associated With Selected Prospect. |
Other database records and information associated with the selected prospect. |
The current list of Prospects will be displayed in the table in the centre of the window (3). Selecting a record from the table will display the associated details in a panel on the right side of the window (4).
Records associated with the selected prospect (targets, drilling opportunities, joint ventures and other information) will be displayed as buttons beneath the table (5). Clicking any of these options will open a new window which can be used to browse the information or records which have been associated with that prospect.
Tutorial: An Overview of the Prospects Table | ||||||||||||||
|
Creating and editing the records, values and other information associated with a Prospect will be explored in detail in the next chapter of this guide, Creating and Modifying Prospects.
The toolbar in the prospects window contains a range of options which are commonly performed within a list of records. These are outlined in the image below.
 | |
1. Change Column Display |
Configure which columns are displayed in the prospect list. This options is used to show/hide columns in the current list. |
2. Export List Contents to CSV |
Export the contents of the current list to a comma delimited text file (CSV file). |
3. Selection Options |
Make bulk changes to the current selection. Use the current selection to create a selection file (for use in other Petrosys applications) or a new database list (allowing the current selection to be retrieved as a list using the Lists search option). |
4. Run Report |
Generate a report from the prospects selected from the list. |
5. Bulk Compute |
Re-compute all “out of sync” fields for prospects in the current selection. |
6. Portfolio Manager |
Manage portfolios, add/remove prospects and create snapshots. |
7. Wizard |
Launches a wizard to guide users through prospect creation. |
8. New Prospect |
Add a new prospect to the current database. |
These options will be discussed in detail throughout the remainder of this guide, and may be explored directly by following the links provided.
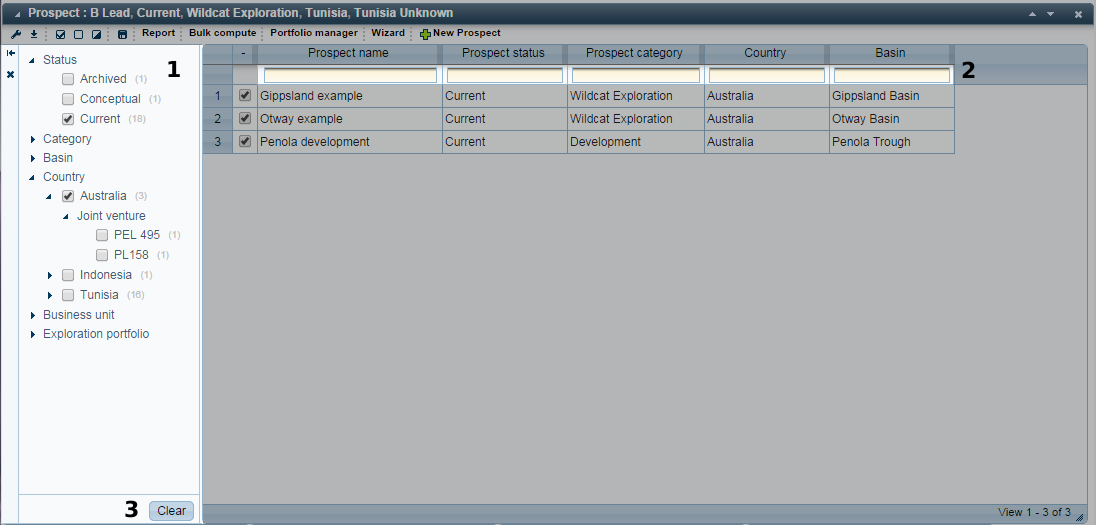
Unwanted records can be filtered from a list of prospects using the filtering options to the left of the table (1). These allow prospects to be filtered based on their status, country or exploration portfolio (NB - This may differ by database). Clicking a heading will reveal a list of the values used by prospects from the current database. Enabling the check-box next to a value will display only records matching the selected value.
 Click to Enlarge | |
1. General Filtering Options (by record content) |
Filter records from the current list by the content of a particular field in the current prospect list. Check-boxes can be used to add/remove items from the current filter. |
2. Column Filtering Options |
Filter list by column value. Records will be filtered based on the value entered into any of the fields beneath the column headings. |
3. Clear button |
Used to clear all items from the current filter. This will reset the current prospects list to its original state (the state it was in prior to the application of any filters). |
As many check-boxes can be enabled as required, allowing relatively detailed filters to be built up in a short amount of time. To clear all filtering options, click the “Clear” button at the bottom of the filtering area (3).
Tutorial: Filtering a Prospect List by Status, Country and Date of Exploration Portfolio | ||||||||||||
|
Prospects can be filtered more explicitly using the fields beneath each column heading in the table (2). These can be used to filter prospects by a specified key-word or phrase. Enter one or more key-words into a field, and prospects will be listed which match the specified filter criteria.
A selection can be used to work with a sub-set of records from within the current list. The most direct way of adding a record to the current selection is by enabling the check-box to the left of the record in the prospect list. If the check-box for a record is enabled, it is a part of the current selection.
 |
Further selection operations are performed using the selection options in the toolbar. These can be used to modify the current selection in bulk, save the current selection to a selection file, or create a new list from the current selection.
 | |
1. Select All |
Add all items in the list to the current selection. |
2. Select None |
Remove all items in the list from the current selection. |
3. Toggle Selection |
Inverts the current selection. Records which are not part of the current selection will be selected. Records which are a part of the current selection will be un-selected. |
4. Save Selection |
Create a new list from the current selection. This can be used to used to retrieve the current selection more quickly the next time the dbMap/web is accessed. |
It is important to note that the current selection affects how other options in the database works. In particular, reporting and other output options (such as export to CSV file) will only operate on records which are a part of the current selection. This makes selection a powerful tool in the selective processing of data, but also one that can easily result in mistakes being made should the wrong selection be made prior to executing a particular operation.
Modifying the Prospect List
The columns displayed by the prospect list can be changed using the Change Column Display option, available from the toolbar in the Prospect window. After clicking the option, a new window will be displayed, which can be used to modify the columns displayed by the list.
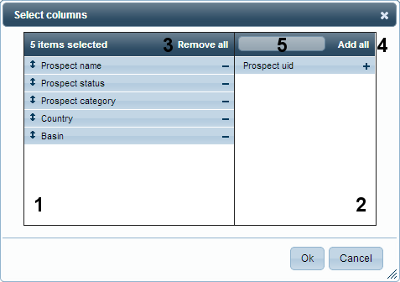 | |
1. Currently Displayed Columns |
A list of the columns displayed by the current table. The “-” icon can be used to remove hide the corresponding item. Columns can be re-arranged by clicking and dragging any of the items to a new location within the list. |
2. Columns Not Being Displayed |
A list of the columns not displayed by the current table. The “+” icon can be used to add the corresponding item to the current table. This list can be filtered using the field in the table heading (5). |
3. Remove All Columns From Display |
Remove all displayed columns (1) from the current table, allowing the column display to be re-configured from scratch. |
4. Add All Columns To Display |
Add all hidden columns (2) to the current table. |
5. Filter Columns by Keyword |
Use keywords to filter the list of columns not being displayed (2). |
After making the required changes, click the OK button to exit the window and return to the main dbMap/Web interface. Otherwise, use the Cancel button to discard any changes and close the window.
There are numerous ways of generating a list of prospects from the current database. In addition to free text search, discussed above, there are also other, more advanced options, which can be used to retrieve data using a much finer set of constraints.
 | |
Construct a search query interactively using combination of search terms and logical operators. |
|
Generate a prospect list using a pre-existing query. |
|
Open a previously defined list. |
|
Generate a list based on a polygon stored in the database. |
|
These options can be useful in larger data sets, or where only a very specific sub-set of data is required.
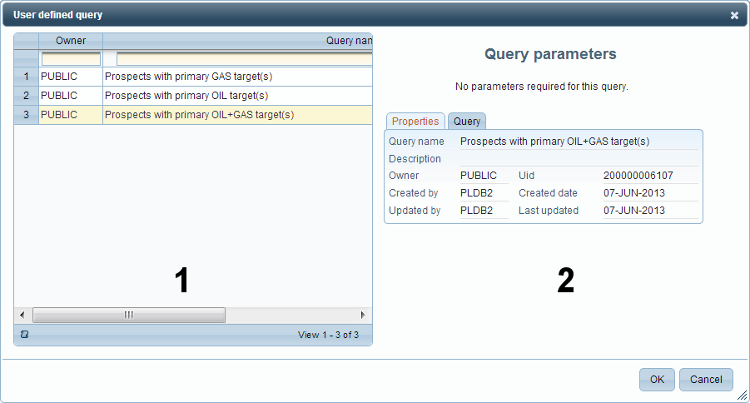
A pre-existing query or list can be used to populate the Prospects table by clicking the “Queries” button, on the right side of the Search area.
 Click to Enlarge | |
1. Query List |
List of queries associated with the current database. |
2. Query Details/Parameters |
Parameters and other details associated with the selected query. |
The window displayed by this button lists all the queries associated with the current database. Parameters, properties and other information associated with the query will be displayed on the right side of the window, after the query has been selected.
The Prospects table can also be populated by a user-defined selection list by clicking the “Lists” button, to the right of the Queries button in the search area.
To show only prospect within a polygon, click the “Database Polygon” button. This will open the polygon selection dialog:
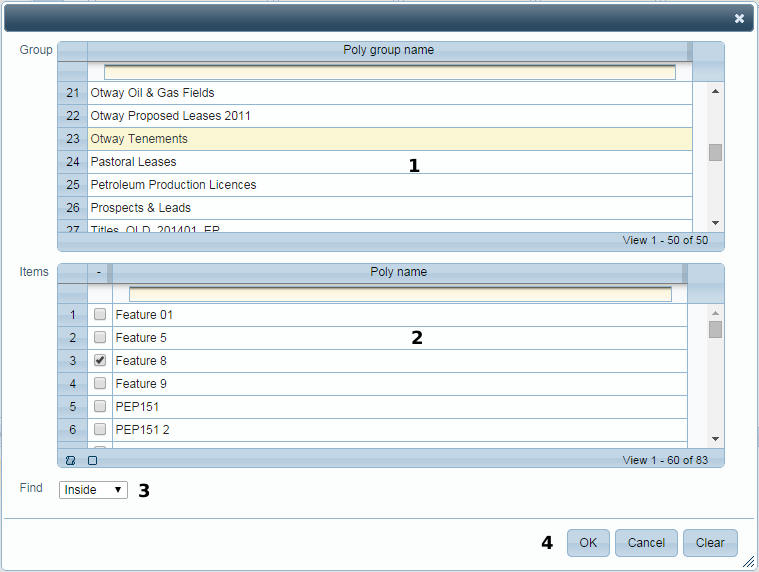 Click to Enlarge | |
1. Polygon Group |
List of polygon groups in the database. Select a group to show the list of polygons below. |
2. Polygon |
List of polygons in the selected group. Select one or more polygons to filter by. |
3. Search type |
There are two options when searching by polygon. “Inside” to find prospects inside the polygon and “Outside” to find prospects outside the polygon. |
4. Dialog buttons |
Click “OK” to search using the selected polygons, “Clear” to reset the dialog selections, or “Cancel” to exit the dialog without searching. |
A series of advanced search options are also available which can be used to retrieve a collection of prospects using fields from the current database. This allows multiple fields to be included in a single search, intermediated by a range of operators, allowing complex searches to be performed using a simple yet powerful interface.